
Introduction
If your leaf blower runs only with the choke on, the engine is usually not getting enough fuel or is getting too much air. The choke limits air and makes the fuel mixture richer. That extra fuel can temporarily hide a clogged carburetor jet, restricted fuel line, air leak, or other fuel-system problem.
This issue affects gas-powered leaf blowers commonly used across the United States. It can happen after winter storage, after using old gasoline, or when small passages inside the carburetor become blocked. In most cases, the blower needs cleaning or a fuel-system repair rather than a new ignition coil.
Start with the simplest checks. Confirm the fuel is fresh, inspect the fuel filter and lines, and clean the carburetor before replacing expensive parts.

What Does “Runs Only on Choke” Mean?
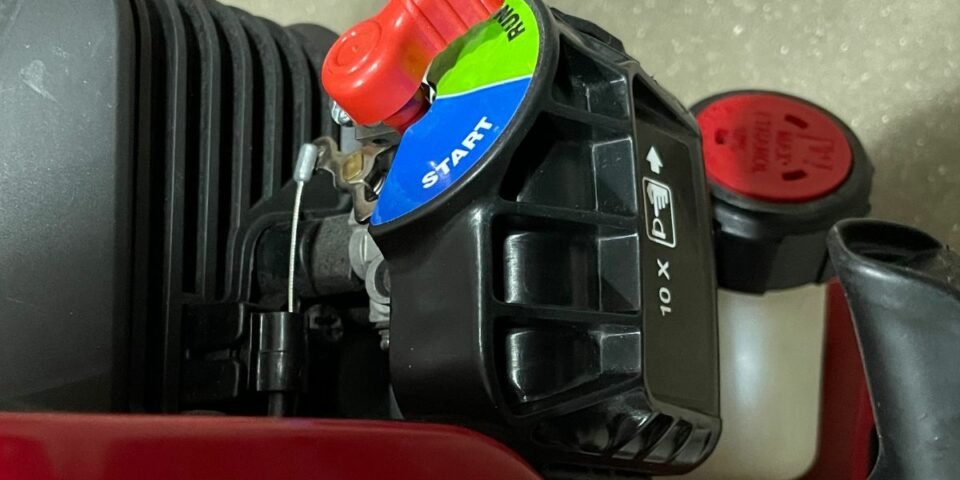
A choke changes the air-to-fuel ratio during starting. When the choke is closed, it restricts air entering the carburetor. This creates a richer mixture with more fuel relative to air.
A cold engine often needs this rich mixture for a short time. Once the engine warms up, you should gradually open the choke. If the engine stalls as soon as you move the choke to “run,” the normal fuel mixture is likely too lean.
A lean mixture has too little fuel or too much air. The choke can hide that problem for a while, but it does not fix the cause.
Common symptoms
Your blower may have one or more of these symptoms:
- It starts with the choke closed.
- It dies when the choke moves to half or open.
- It surges or hunts at full throttle.
- It runs only at high speed.
- It improves when you partially close the choke.
- It has poor power and weak airflow.
- It has trouble restarting when warm.
The exact symptom helps narrow the fault. A blower that dies instantly when the choke opens often has a blocked main jet or a major air leak. A blower that runs poorly in every choke position may have several problems.

The Most Likely Causes
The most common cause is a restricted carburetor fuel passage. However, several parts can create the same symptom.
1. A clogged carburetor jet
The carburetor has small passages and jets that meter fuel. Old gasoline can leave gum or varnish behind as it evaporates. Dirt or corrosion can also block a jet.
The main jet supplies fuel as the engine speeds up. If it is partly blocked, the engine may run with the choke closed because the choke supplies the extra fuel the engine lacks.
2. Old or contaminated gasoline
Gasoline degrades during storage. Fuel that contains ethanol can also attract moisture when stored incorrectly. Water, dirt, or separated fuel can prevent proper combustion.
Do not assume fuel is good because it looks clear. If the blower sat for several months with fuel in the tank or carburetor, replacing the fuel is a reasonable first step.
Use the fuel type and mixture listed in the owner’s manual. Many two-stroke blowers require fresh gasoline mixed with the correct two-cycle oil. A four-stroke blower normally uses gasoline without two-cycle oil in the fuel tank.
3. A blocked fuel filter or fuel line
A clogged in-tank filter can reduce fuel flow. A soft, cracked, kinked, or swollen fuel line can also limit delivery.
Small engine fuel lines may deteriorate over time, especially when exposed to ethanol-blended fuel. If a line collapses when the engine runs, the blower may starve for fuel.
4. An air leak near the carburetor
A damaged carburetor gasket, loose mounting screw, cracked intake boot, or failed crankcase seal can let unmetered air into the engine.
This extra air makes the mixture lean. Closing the choke reduces the air supply and may allow the engine to keep running.
Look for cracked rubber, loose screws, or a gasket that has shifted. Do not spray flammable liquids around a running engine to search for leaks. That method creates a fire risk.
5. A blocked fuel-cap vent
The fuel tank needs air to replace the fuel leaving the tank. If the vent in the cap is blocked, a vacuum can form inside the tank. Fuel flow then slows or stops.
A quick clue is a blower that runs for a short time and then dies. If opening the fuel cap briefly restores operation, the vent may be restricted. Replace the cap if the owner’s manual identifies it as a vented part and cleaning does not solve the issue.
6. Incorrect carburetor adjustment
Some older carburetors have adjustable low- and high-speed mixture screws. Many newer blowers use limiter caps or fixed settings.
Turning adjustment screws at random can make the problem worse and may cause an unsafe engine speed. Use the service instructions for the exact model. Do not remove limiter caps unless the manufacturer’s procedure allows it.
7. A dirty air filter
A dirty air filter usually restricts air and creates a richer mixture. It is less likely to cause a blower to run only on choke, but it can cause hard starting, smoke, and poor power.
Inspect the filter during diagnosis. Replace a paper filter or clean a foam filter according to the manual. Never run the blower without its air filter unless the manufacturer’s service procedure specifically requires a brief test.
8. A restricted muffler or spark arrestor screen
Carbon can build up in the muffler or spark arrestor screen. This restricts exhaust flow and can reduce power.
This problem more often causes low power and difficulty reaching full speed than a choke-only symptom. Still, inspect the screen if fuel-system checks do not solve the issue.

How to Troubleshoot a Leaf Blower That Runs Only on Choke
Work from the easiest and safest checks to the more involved repairs. Stop if you find a damaged fuel tank, leaking fuel, a cracked engine part, or a problem you cannot identify.
Step 1: Identify the engine type
Check the label, owner’s manual, or fuel instructions.
- Two-stroke engine: Uses gasoline mixed with two-cycle oil at the specified ratio.
- Four-stroke engine: Uses gasoline in the fuel tank and engine oil in a separate crankcase.
Using the wrong fuel can damage the engine or cause poor running. Never guess the oil ratio. A mixture that is too rich in oil can foul the spark plug, while too little oil can damage a two-stroke engine.
Step 2: Replace questionable fuel
Work outdoors, away from flames, sparks, heaters, and smoking materials. Let the engine cool.
Drain old fuel into an approved container. Do not pour gasoline onto the ground or into a household drain. Dispose of it through an appropriate local household hazardous-waste or recycling program.
Add a small amount of fresh fuel that matches the manual. If the blower runs normally afterward, stale or contaminated fuel was likely part of the problem.
Step 3: Check the fuel line and filter
Inspect the visible fuel line for:
- Cracks
- Kinks
- Soft or swollen sections
- Loose connections
- Fuel leaks
If the tank has an internal filter, follow the manual before attempting removal. Replace a blocked filter with the specified part. Do not install a filter that is too large or too restrictive for the fuel system.
Step 4: Inspect the air filter
Remove the air-filter cover with the engine off and cool.
Clean or replace the filter as directed. Make sure the cover seals correctly. A missing gasket or poorly fitted cover can alter airflow and let dirt enter the engine.
Step 5: Check the fuel-cap vent
Run the blower only if the manual and safe operating conditions allow the test. If it stalls, loosen the fuel cap briefly. If the engine recovers, the cap vent may be blocked.
Do not operate the blower with the cap loose as a permanent solution. Replace or service the cap correctly.
Step 6: Inspect the carburetor area
Look for loose mounting screws, damaged gaskets, and a cracked intake boot. Check for wet fuel around the carburetor. Fuel leakage is a stop-and-repair condition.
Do not use a spray cleaner near a running engine. Gasoline and many cleaners are flammable.
Step 7: Clean the carburetor
If basic checks fail, remove and clean the carburetor according to the service manual.
A proper cleaning may include:
- Closing the fuel supply or draining the tank.
- Removing the air filter and carburetor.
- Photographing hose and linkage locations.
- Removing the bowl or diaphragm cover.
- Cleaning the main jet and internal passages with approved carburetor cleaner.
- Replacing damaged gaskets, diaphragms, or O-rings.
- Reassembling the parts in the correct order.
- Checking for leaks before starting.
Do not force wire through a precision jet. A hard wire can enlarge the opening and change fuel flow. Use the correct cleaning method and replacement parts for the model.
Step 8: Check the spark plug
A fouled or worn spark plug can cause poor starting and misfiring. It is not the most common reason for a choke-only condition, but it is easy to inspect.
Replace the plug if it is cracked, badly carboned, wet with fuel, or worn beyond the manual’s limit. Set the gap only to the specified measurement.
Step 9: Inspect the spark arrestor and muffler
With the engine cool, remove and inspect the spark arrestor screen if the model has one. Clean or replace it as the manufacturer directs.
A blocked screen can reduce exhaust flow. If the muffler itself is damaged or heavily carboned, professional service may be safer.

Quick Diagnostic Table
Use this table to match the symptom with the most likely area. It is a starting point, not a substitute for the model’s service manual.
| Symptom | More likely causes | First check |
|---|---|---|
| Starts on choke, dies when choke opens | Clogged main jet, lean air leak, restricted fuel flow | Fresh fuel and carburetor |
| Runs with partial choke only | Partly blocked jet or air leak | Carburetor and intake gasket |
| Runs for a few minutes, then dies | Blocked fuel-cap vent, tank filter, or fuel line | Fuel cap and fuel flow |
| Smokes heavily and runs poorly | Too much oil, dirty air filter, overfilled four-stroke oil | Fuel mix and oil level |
| Surges at idle or full speed | Air leak, dirty carburetor, mixture problem | Intake area and carburetor |
| Has weak airflow but keeps running | Restricted muffler, dirty spark arrestor, engine wear | Exhaust screen and blower tube |
| Will not start even with choke | No fuel, flooded engine, weak spark, compression issue | Fuel, plug, and manual procedure |
The most useful distinction is whether the engine runs normally at all with the choke open. If it does not, focus first on fuel delivery and unmetered air.

How to Fix the Problem
The correct repair depends on what the checks reveal.
If the carburetor is dirty
Clean the carburetor or install a model-specific carburetor repair kit. A kit may include a diaphragm, needle valve, gasket, and primer components.
Replace rather than clean a carburetor when the body is damaged, the throttle shaft is excessively loose, or corrosion has damaged its internal surfaces. Match the part to the exact model number, not only the brand.
If the fuel lines are damaged
Replace all damaged lines with fuel-resistant tubing of the correct inside diameter. Route each line exactly as shown in the manual. A supply line and a return line may use different paths or sizes.
Incorrect routing can cause fuel starvation even when the new line looks undamaged.
If there is an intake air leak
Tighten loose fasteners to the manual’s specification and replace damaged gaskets or boots. Avoid over-tightening small carburetor screws. Too much force can strip the housing or warp the carburetor.
If the leak appears to come from an engine seal, seek qualified repair. Seal replacement may require major disassembly.
If the blower has an adjustment screw
Adjust it only with the manufacturer’s procedure. Make small changes and keep the engine within the specified operating range.
An engine that runs only because the choke is partly closed is not properly tuned. Continued use can increase heat and reduce engine life.

Common Mistakes to Avoid
Several quick fixes can create new problems.
- Do not keep using the blower with the choke partly closed. It only masks the lean condition.
- Do not spray starting fluid into the intake. It can create a fire risk and may damage engine parts.
- Do not mix two-stroke oil by guesswork. Use the ratio in the manual.
- Do not clean jets with a hard metal wire. The opening may become permanently oversized.
- Do not adjust every carburetor screw at once. You may lose the original setting.
- Do not test for an air leak with an open flame. Gasoline vapor can ignite quickly.
- Do not work on a hot engine. Fuel vapors and hot exhaust parts create serious burn and fire hazards.
- Do not run the blower indoors. Gasoline engines produce carbon monoxide, an odorless and potentially fatal gas.
Wear eye protection when using compressed air or carburetor cleaner. Keep hands, clothing, and hair away from the impeller and moving parts.

When Should You Stop and Call a Repair Professional?
Get professional help when the blower has a fuel leak, damaged fuel tank, severe flooding, suspected crankcase damage, or an engine that still runs only on choke after carburetor service.
Professional diagnosis is also sensible when:
- The engine has very low or uneven compression.
- The crankshaft seal may be leaking.
- The carburetor screws are stripped.
- The blower overheats or makes a metallic noise.
- The engine reaches an unsafe speed.
- You cannot identify the correct fuel mixture.
- The model requires special tools or electronic diagnosis.
A qualified technician can perform a compression test, pressure or vacuum test, and carburetor inspection. These tests can separate a simple fuel problem from internal engine damage.

How to Prevent the Problem
Good fuel storage reduces the chance of a choke-only failure.
Use fresh fuel and store it in an approved, sealed container. Follow the fuel stabilizer label and the blower manufacturer’s instructions. Stabilizer slows fuel degradation, but it does not restore badly deteriorated gasoline.
For seasonal storage, follow the owner’s manual. Some manufacturers recommend draining the tank and running the carburetor dry. Others permit stabilized fuel to remain in the system. The correct method depends on the carburetor design.
Before long-term storage:
- Clean leaves and debris from the housing.
- Inspect the fuel lines.
- Clean or replace the air filter.
- Check the spark plug.
- Store the blower in a dry, ventilated place.
- Keep fuel away from heat and ignition sources.
Run the blower at full operating temperature from time to time when appropriate, but do not run it indoors or in an enclosed garage.

Frequently Asked Questions
Can a bad spark plug make a leaf blower run only on choke?
It can cause hard starting, misfiring, or weak power, but a dirty carburetor or air leak is more likely when the blower runs with the choke closed and dies when the choke opens. Inspect the spark plug after checking fresh fuel and fuel flow.
Is it safe to use a leaf blower with the choke partly closed?
No. The choke is for starting and warm-up, not normal operation. Continued use can produce excess heat, carbon buildup, poor power, and possible engine damage.
Can ethanol fuel cause this problem?
Ethanol-blended fuel can contribute to fuel-system problems when stored incorrectly. It may absorb moisture and can leave deposits as it ages. Use the fuel grade and storage method specified in the owner’s manual.
Should I replace the carburetor or clean it?
Clean it when the carburetor is structurally sound and the problem appears to be dirt or varnish. Replace it when the body, throttle shaft, diaphragm seat, or other key parts are damaged. Use the exact model number when ordering parts.
Why does the blower run well cold but fail when warm?
Heat can expose a restricted fuel flow, failing tank vent, ignition fault, or air leak. If loosening the fuel cap changes the symptom, inspect the vent. If the engine loses spark only when hot, professional ignition testing may be needed.

Conclusion
A leaf blower that only runs on choke usually has a lean fuel mixture. The most common causes are a dirty carburetor, stale fuel, restricted fuel delivery, or an air leak near the intake.
Start with fresh, correctly mixed fuel. Then inspect the filter, fuel lines, fuel-cap vent, carburetor, and intake gasket. If cleaning and basic repairs do not restore normal operation, stop using the blower and have the fuel system, compression, and ignition checked by a qualified technician.
The next best action is simple: identify the exact model, read its fuel instructions, and begin with the safest checks before removing the carburetor.